Showing posts with label Avanza. Show all posts

Thursday, 3 November 2016

Avanza: Power window master switch failure (solved)

DIY Disclaimer: I hold no responsibility should anything goes wrong when you decided to follow my guide. It’s strictly meant as a reference for knowledge sharing purposes.

Part number: 84820-B0010

A new switch would set you back USD39.98

image

Carefully pry open the bottom of the power window controller.

IMG_20161029_181108132

Carefully lift up the printed circuit board

image

You will notice the failed switch has a broken white color plastic which is responsible to maintain the position of the rocker/flipper switch.

image

Viola! Discovered “Satay” stick is the perfect replacement for the broken plastic.

image

image

Cut the “Satay” stick to the required size

image

When reinstalling the printed circuit board, make sure the white color switch slide is in the middle and fitted into the roker switch.

image

Test the switch. If too tight, the Satay is too long, vice versa.. Laughing out loud

Saturday, 30 June 2012

Avanza: New Rear Engine / Transmission Mounting (DIY)

2005 Toyota Avanza AT 1.3L

Mileage: 180k km

The repair job I did about 9 months ago failed again.

The vibration of engine can be felt in the cabin especially during high speed, so mush so there’s vibration on the steering.. Surprised smile

Finally settled with a brand new original mounting:

INSULATOR, ENGINE MOUNTING, REAR NO.1

Part no.: 12371‑BZ010

image

The mounting is actually located behind the transmission and fitted underneath the mounting bracket 12321E in the following diagram:

image


2012-06-30 13.39.18

The DIY write-up can be obtained from my last repair job posting:

http://upgr8s.blogspot.com/2011/10/avanza-diy-repair-transmission-mounting.html

I strongly advice Avanza owners conduct a periodical visual check on the condition of their mount [look out for crack lines, replace when excessive] because being a hardy Toyota, the car can still be used even when the mount is badly worn and if the owner is not particular or sensitive enough, may not even notice it. Driven around with a worn engine mounting may cause other components of the car to fail due to the excessive vibration of the engine, I suspected my ATF metal cooler tube ruptured by this excessive movement/shift of the engine/transmission, now suffered from leaky ATF.. Crying face

Next DIY will get it fixed, one way or another.. Winking smile

Thanks for reading and stay tuned for more to come.

Sunday, 30 October 2011

Avanza’s 4th Battery

Used the car on Saturday morning, but failed to start in the same evening when we want to drive out for dinner. I got the following replacement.

Panasonic MF

The translucent shell on the MF battery allows us to check water level.. too bad no ready stock for NS40, had to settle for this NS60 replacement.

Age of car: 6 years 4 months

Mileage: 167,000km

Monday, 10 October 2011

Avanza: DIY Squeaky Drum Brake / Brake Dust Cleaning

I just found this in my archive. It is a procedure to clean our rear brake dust because when it cumulates, it created squeaky noise. This job was done in October 2010.

Tools needed:

1) Wheel opener

2) Size 12 bolt

3) Brush

4) Size 12 wrench

5) Car jack

6) Rubber hammer

Loosen (not remove!) the wheel lug, jack up the rear, remove the wheel, use the size 12 bolt to screw in for pushing the hub cover out

Hint: Secure the all 3 others wheels from rolling because to perform this, you must release the parking/hand brake. If not, the parking brake will grab on tight to the hub cover and you wouldn’t be able to remove the hub cover. This is not a front wheel drive vehicle, so the front wheel will roll freely if we lift the rear.

The rubber hammer is to knock the hub to loosen it while screwing in with the size 12 bolt.

P210810_14.31

This is how the rear brake internal looks like. You can clearly see the rear brake shoe still appears to be very thick. This is at above 100k km. Original 6 years old brake shoe, never replace before.

P210810_14.31_[01]

This is a close up of my humble tools. Smile Check out the hub cover on the left, there a tiny hole for the size 12 bolt to screw in, that’s how we force the hub cover out.

P210810_14.31_[02]

Check out the amount of dust I managed to dust out. Surprised smile

P210810_14.33

To  put the hub cover back, just put it back in and fasten the wheel.

Hint: Jack one rear wheel at a time because the other rear wheel needs to remain on the ground. The transmission selector set to ‘P’, the other rear wheel will help secure the car from rolling. Still, for extra precautionary measure, use objects like bricks to block both front wheels and the other rear wheel from rolling. When jacking, do it slowly and monitor the car for the slightest rolling if any. Can be potential safety hazard if this is not observed.

That’s all for now. Hope you enjoy my write up.. till next blog update, Adios! Smile

Sunday, 9 October 2011

Avanza: DIY Repair Transmission Mounting

A recent change of transmission fluid has led me to inspect the transmission mounting while I crawled under the car, and I’m suspecting it has cracked.

I also noticed an occasion knocking sound from the central cabin tunnel when going through bumps.

So I came across this epoxy adhesive which is perfect for the job.Smile

It has 3 types, 4min, 5min and 90min and each can withstand 3 tons, 3.5 tons and 4 tons respectively. I think 90 min is too long, hence I picked the 5 min variant. The entire car doesn’t even weight 3 tons.. Smile with tongue out

P1030542

Going under the car again and yes, the black clean line is created due to rubbing, meaning there are movement between the top plate and the 2 rubber support blocks, which shouldn’t happen unless the section has cracked or broken.

P1030547

This following photo is taken from the rear, notice the same black crack lines between the V-shape top plate and the 2 rubber blocks? Oh! That’s my pet taking her nap in the back ground.. Smile

P1030548

Found a jack point, it’s at the flywheel housing, at the joint where the transmission is connected.

P1030585

After jacking the transmission up, the gap between the top plate and the 2 rubber blocks are clear!! Surprised smile

P1030556

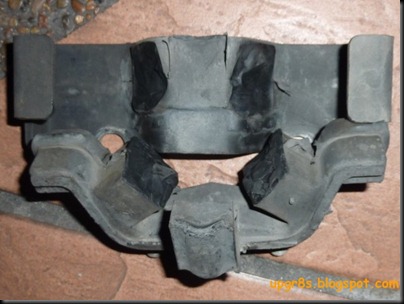
Since the gap is not wide enough for me to apply the epoxy adhesive, I had to remove the mounting. 2 size 14mm bolts at the top and 2 size 14mm nuts at the bottom, to be accessed through the bottom cross beam. Look at the following picture after ripping off the 2 sections.. Surprised smile The 2 sections are supposed to be moulded together.
P1030557

Here goes nothing.. mix the epoxy with the hardener.. the mix is actually hot, an increase in temperature due to the chemical reaction.

P1030562

I only apply one side, the top plate. Then slide the top plate over the rubber blocks.. I need to act swift because I only have 5 min before the epoxy harden even though it takes hours to fully cure.

P1030565

Installing the transmission mounting back to it’s original location.. Hint: Put in the top bolts first before tightening the bottom nuts because the top bolts do not have free play while the bottom has.

P1030571

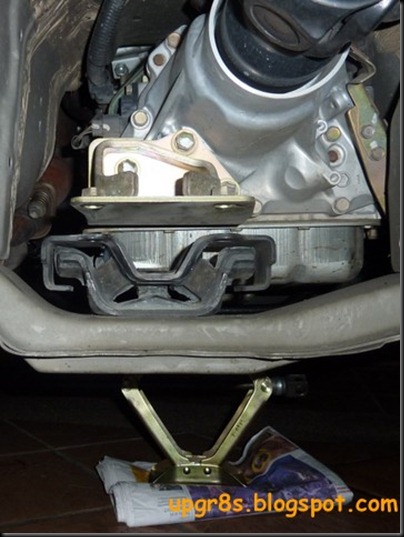
Slowly lower the jack..

Hint: I lay some old newspaper under the jack to distribute the weight because I worry I might crack my tiles.
P1030572

Viola! Smile

P1030580

I think the past 7 years, 160k km of flying over speed bumps and uneven road have finally taken a toll on the transmission mounting.. but fear not, after tonight, flying continues.. !!! Smile with tongue out

Thank you for reading. Comments are welcome! Winking smile

Friday, 7 October 2011

Avanza: DIY Power Steering Fluid Replacement

Hand wash pump, stick it into the power steering reservoir and pump. Be careful not to pierce the strainer inside the reservoir. This is not a perfect method because:

1. The insert of the hand pump too hard, can damage the metal strainer netting in the reservoir.

2. The hand pump suction is not powerful enough to siphon out debris in the reservoir. After I siphoned out the fluid, a peek with a torch light revealed that there’s debris inside the reservoir.

The next time I do this, you should see some improvement to my method.  

LGIM0198

Check out the fluid color. On the left is from my 1 day old partial drained transmission fluid, taken out due to overfilled. On the right, is the one taken out from my power steering reservoir. Dirty eh?!

Still the power steering fluid appear less dark comparing to the transmission fluid. Planning for a full drain in 20k km time. Stay tuned!

The 3L partial drain of transmission fluid is really hopeless!

LGIM0202

Thank you for reading.. Winking smile

Comment appreciated.

Friday, 23 September 2011

Avanza: DIY Removal of Excess / Overfilled ATF

1 day after I replaced the ATF, even with around 2.3L of ATF, I still felt overfilled. So that prompted me to perform this next DIY: To siphon out excess or overfilled ATF.

I connected the hand soap nozzle to a rubber hose as my siphon device. Insert the other end of the rubber hose into the transmission via the transmission fluid dipstick entrance. Use an empty drinking bottle as a catch, keep pumping the ATF out. It takes less than 3 minute to get rid of my following excess ATF. Don’t forget to check the ATF level once in a while during pumping to avoid over siphoning of the fluid leaving insufficient fluid in the transmission..

Check out my state-of-the-art device.. LOL! Open-mouthed smile

M1

The ATF I managed to siphon out.. Check out how dirty the fluid is despite only 1 day after the ATF change. This is because only less than 40% of the oil fluid is drained through transmission oil pan. The bulk of it still stuck in the torque converter. So moral of the story, replace your ATF more often. I am practicing every 40k km but I certainly recommend 20k km if your time and budget permit. In fact every litre of the genuine Toyota D-III ATF sold by the authorised service centre only cost MYR19, so 3L only cost less than MYR60. You can even fill your empty fuel tank with that amount of money. By the way, the balance fresh ATF can be used to replace your power steering fluid in the power steering reservoir. They share the same type of fluid. To siphon your power steering fluid from it’s reservoir, same technique, via the power steering fill / dipstick cap. Winking smile

M1

Avanza: DIY ATF Replacement

Unscrew the drain bolt under the transmission oil sump/pan, it’s a size 14 bolt.

Don't understand why the ATF drain bolt is not located at the lowest point of the sump, how to fully drain the old fluid on the sump? The only explanation I can think of is IF the bolt were lost, not all fluid "escape" so gearbox may survive.. I had to lift the front right wheel using the jack until maximum the jack can provide.. to tilt the pan to try get as much of the old fluid out. Next time can consider siphon technique, releasing from drain bolt doesn't get rid of old lube as well as siphon technique since the siphon tube can reach the bottom of the pan.

M1

Only about 2L is drained.. Sad smile

M1

I bought the drain bolt washer from the authorised service centre, the metal o-rings are for the rear diff, one each for drain and refill screw. The “paper” type is the same as engine oil drain bolt gasket, meant for transmission drain bolt. Didn’t get to use though because lazy to remove the old gasket. Very tightly stuck onto the ATF pan.

M1 

For refill, I joined some larger diameter straws, to be exact, 3 of them together using salophen tape to pipe the fresh ATF in.

M1 

I bought extra ATF but seriously, 3L is more than sufficient.

M1

Check out the DIY funnel.. heh! liquid medicine measurement cup for the kid + silicon sealant nozzle, hot glued together.. Open-mouthed smile