Showing posts with label Rear Absorber. Show all posts

Saturday, 10 May 2014

BMW E90 DIY Rear Absorber Bump Stop / Damper

DIY Disclaimer: I hold no responsibility should anything goes wrong when you decided to follow my guide. It’s strictly meant as a reference for knowledge sharing purposes.

Been noticing my rear absorber central shaft exposed. The bump stop that’s suppose to hold on to the dust cover has disintegrated due to ageing. The dust cover is very crucial in protecting the absorber from grime and sand which get stuck onto the central shaft. The shaft slides up and down during operation and any dirt on the shaft will damage the oil seal in the absorber and causing it to leak.

2014-05-10 08.36.13

PROCEDURE:

1. Open the left and right panel carpet in the trunk.

2. Open the rubber cover on top of the wheel well in the boot area and you will see the nut securing the absorber.

2014-05-10 08.34.45

3. Use a size 16mm ring offset spanner for the absorber nut while securing the central shaft with a hex bit wrench.

 2014-05-10 08.36.57

4. Can safely remove all the nuts and washer and we can now slowly jack up the car.

2014-05-10 09.54.58

  2014-05-10 10.04.41

5. When the car raise, the wheel will drop and slowly widening wheel fender gap. As soon as you can reach your hands in comfortably, stop jacking and secure the vehicle whichever way you preferred. Slide down the absorber shaft and Voila! Bump stop and dust cover can be removed. From the photo below you will notice we do not even need to remove the wheels.

2014-05-10 09.46.05

6. Remove all the seats and washers. Refer to the red box below. Stack them together during installation. Only item 7 is installed from the top. Trust me, I learned the hard way.. Open-mouthed smile

image

7. Release the jack and fasten the top nut. Done! Now do the same to the other wheel.. Smile

2014-05-10 10.03.10

UPDATE:

Similar procedure for rear absorber replacement:


Thank you for reading and please provide feedback or query if any.. Winking smile

Sunday, 3 September 2006

DIY Avanza Rear Absorber Replacement

Tools: Size 17 wrench

Time: 20 min. (comfortably) or 5 min. (Rush job)

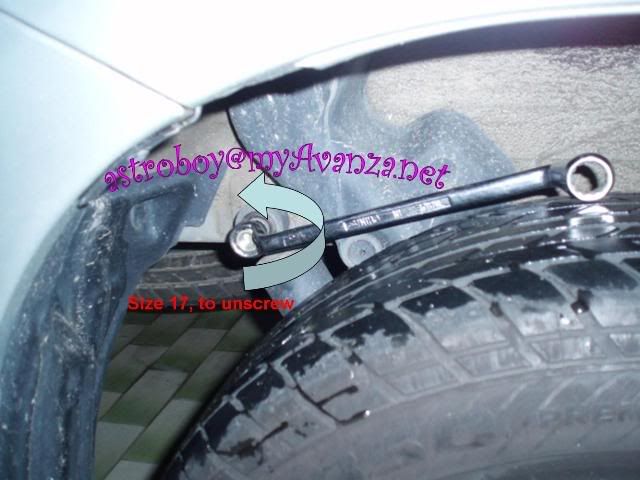
Pic1: Unscrew the top screw, size 17


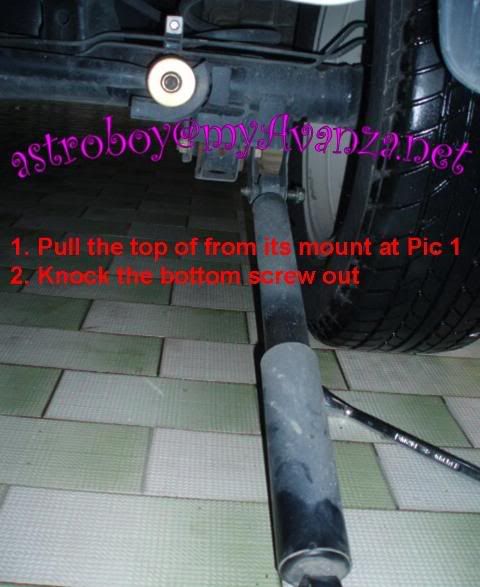
Pic2: Unscrew bottom screw, size 17


Pic3: Grab the OEM absorber by reaching our hand in from the fender and pull the absorber out from its mount. (Typo: ..Top OFF..)


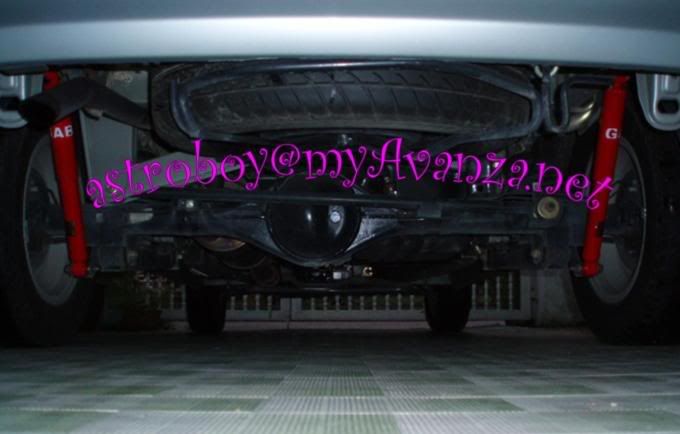
Pic4: Red vs Black


Pic5: Final result.. ;D


Installation of new absorber: No picture taken here because not enough hands.. :P

1. Mount the bottom end, insert screw.
2. Use hand to force the absorber to contract until max, then let it rebound but quickly push the absorber top back into the top chassis mount screw.
3. Fasten all bolts.

Note: Do one absorber at a time.

Must read:
When take her out for a test ride (dinner with family). First 100 meter was smooooth…, then the knocking sound came… “k-lok..k-lok..” like riding a horse..

Started from the left rear, then “infected” to the right rear too. Then it “k-loks” all the way to dinner and back. Everyone was in fear that the wheels may drop off any time. I stop the car, check for loose screw (visual). The bolts are still there woh.. ::)

After returning from dinner, went under again to inspect the job. Found the screw somewhat loose !! Screw it back in, test few hundred meters round our garden, high speed. A-Okay!

Morale of the story: No matter how small of the job can be, or how confidence are u in the job, ALWAYS test drive the car for reasonable distance after ALL DIY jobs to ensure things are done COMPLETE and all screws are tighten..

Knowledge gain: When u hear “k-lok..k-lok” like using hammer knocking the floor board or like riding horse.... = UR ABSORBER SCREW LOOSE LIO!!!

Am in outstation now, will load the car kao-kao to run in the absorber on my way returning to KL later.. ;D

Warning: This DIY only applicable for suspension with similar design. Our front absorber is totally different and removal of front absorber, the car need to be jacked up and have wheels removed. So not all suspension are desinged the same.

Our rear spring is holding up the weight of the car and is a separated independent set of components. So by removing the rear absorber, the car won’t "drop" onto the ground.. :P

Happy DIY-ing.. ;)