Showing posts with label Coolant Antifreeze leak. Show all posts

Saturday, 30 July 2016

BMW E90 320i N46B20 Cooling System Leakage


DIY Disclaimer: I hold no responsibility should anything goes wrong when you decided to follow my guide. It’s strictly meant as a reference for knowledge sharing purposes. 

Symptom:

1. Coolant warning pops up.

image

2. Wetness on the bottom engine cover directly below the intake manifold area.

image

3. On closer inspection, stick a torchlight behind the oil filter housing

IMG_20160729_225451975

You will see this..

IMG_20160729_225508034

IMG_20160729_225430529_HDR

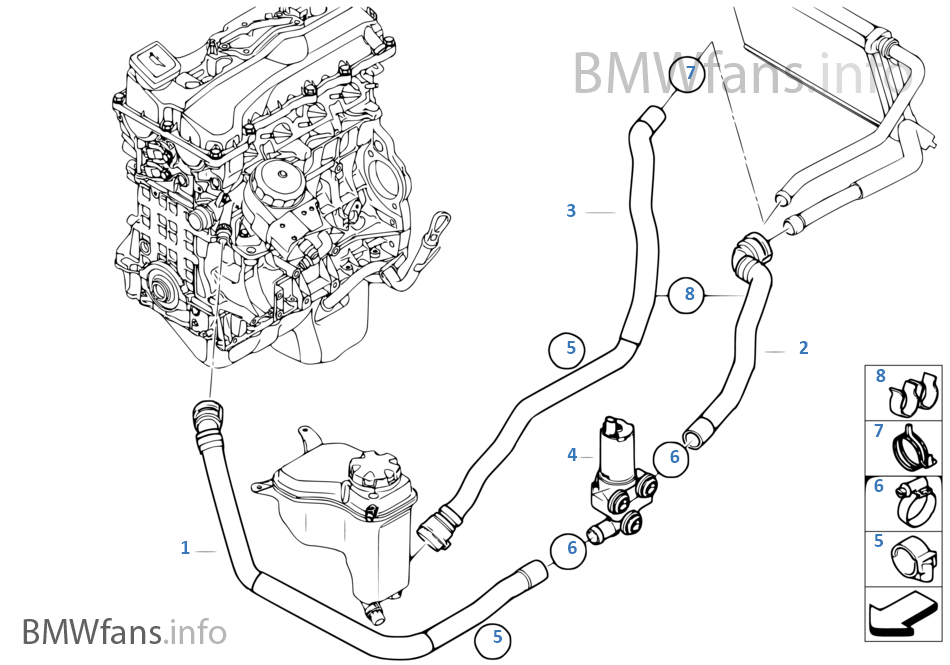
The following is the culprit..

image

Source: http://bmwfans.info/parts-catalog/E90/Malaysia/320i-N46/R-N/apr2007/browse/engine/cooling_system_water_hoses/#7560130_4

Parts required:

Item 4: Connector: 11 53 7 560 130, comes with profile gasket

IMG_20160730_144004437

I also bought the hose (Item 1 below) because coolant stains appear at the connector area.

Hose f engine inlet and addit.water pump: 64 21 6 928 590

http://bmwfans.info/parts-catalog/E90/Malaysia/320i-N46/R-N/apr2007/browse/heater_and_air_conditioning/additional_water_pump_water_hose_valve

Additional water pump/Water hose/Valve

Only 2 size 10mm bolts holding to the Connector, very easy job.

After the connector is removed:

IMG_20160730_152102766

New versus old

IMG_20160730_153852082_HDR

The culprit.. just the gasket..but for peace of mind replace the entire connector.

IMG_20160730_153858059_HDR

Lastly, top up coolant accordingly.

OK folks! That’s all the photos I have to share.

Good luck and thanks for dropping by.. Winking smile

Sunday, 12 October 2014

BMW E90 N46B20 Water Pump / Thermostat / Thermostat Housing

DIY Disclaimer: I hold no responsibility should anything goes wrong when you decided to follow my guide. It’s strictly meant as a reference for knowledge sharing purposes.

2007 BMW E90 N46B20

Mileage: 108k km

Been losing 500ml coolant weekly.

Photo taken from beneath the power steering pump.

2014-09-26 20.54.16 

I have no idea where the leak came from due to limited visual access but I can confirm it is from one of the water pump components. And losing fluid at 500ml a week, I can’t be keep topping up and dilute my coolant mix which is not healthy for the engine.

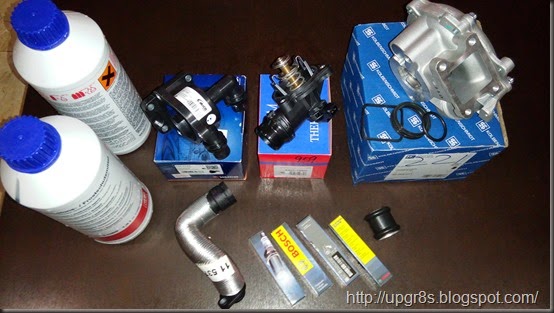
So I decided to take the plunge by buying all the components for that location (just in case), including one of the short hose.

Item 1: Water pump: 11 517 511 221

Item 2: Thermostat: 11 537 510 959

Item 4: Thermostat Housing: 11 517 572 859:

Item 7: Connector: 11 517 542 128

image

.. and Item 1: Water Hose: 11 537 572 159

image

2014-10-04 17.00.07

The spark plugs are for different project. Smile with tongue out

The rubber O-ring came with the water pump are not utilized because the rectangle one already available in the new thermostat housing while the round shape O-rings are for the old connector which was designed differently. New connector as you can see from the photo above at 4 o’clock location is entirely coated with rubber.

Workshop guide:

http://workshop-manuals.com/bmw/3_series_e46/316i_n42_sal/2_repair_instructions/11__engine_(n42)/51__water_pump_with_drive/1_ra__removing_and_installing_replacing_water_pump_(n40_n42_n45_n46)/page_748/

image

image

1. Our E90 N46B20 power steering pulley actually do not have the 3 holes to reach for the 2 water pump fastening bolts. Hence the only way is to remove the power steering pulley. Slacken the 3 x T40 bolts on the power steering pulley before remove the V-belt. The tension provided by the belt help securing the pulley from spinning freely. The pulley is very light and made of plastic material.

2. Use a size 16mm wrench to tension up the V-belt tensioner and release the V-belt.

3. Remove the power steering pulley.

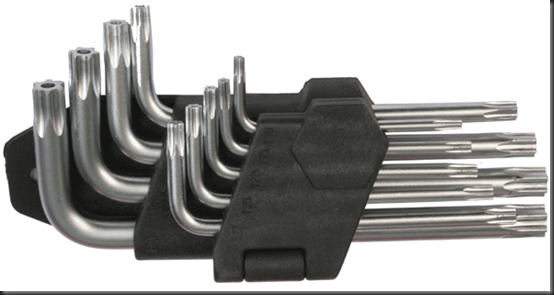
4. Slacken the 2 x T40 bolts fastening the water pump to the power steering pump. These bolts are very tight. My Torx key set failed me because it bent when I apply force:
image 

I had to order this:

image

5. Now the tricky part. The 4 x T45 bolts is hard to reach. Luckily they are not extremely tight compared to the above. The “L” shape Torx key excels. The T45 bits I bought is mostly hopeless here due to the narrow access.

Below is how I slacken (NOT RELEASE) the T45 bolts and if you are confident, you can release the water hose connections as it will give you a bit of extra room:

image

6. Water hose disconnection. Start from the top. Lift up the metal clip (refer bottom picture, from point A to point B) and wiggle your way out, 3 hoses connected to the thermostat.

imageimage

7. Disconnect the thermostat wire located at the bottom of the thermostat.

Got the following from Pelicanparts. Similar connector. Just press the metal clip to the green arrow’s direction and pull the plug off.

pic10.jpg (1536×1047)

8. Now you can release the 4 x T45 bolts. The water pump connector may still be hanging to the engine and require some prying to get it out.

image

9. After both the power steering pump and water pump is out, then only I remove the 2 x T40 that fasten the power steering pump and water pump together. Water pump can then be taken out. Viola!
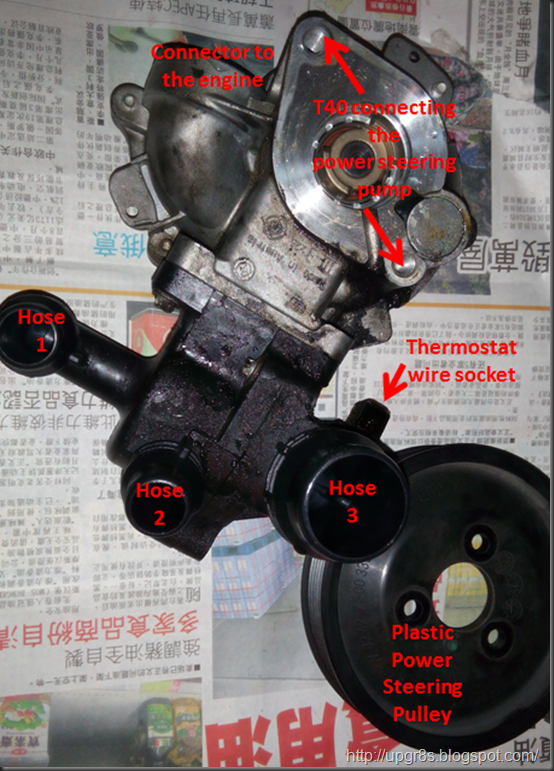
image

Removal took less than 45 minutes. Installation is not easy. Remember to fasten both power steering pump and water pump together before attempting the 4 x T45 power steering pump mount. Do not forget the connector at the water pump. Very tricky to put it back in because it keeps jumping out.

All in, I spent 4.5 hours to complete the job, inclusive of beer break in between.. Started 8:30pm, completes 1am.

More photos for references:

Power steering plastic pulley can be open using the T40 Torx key. Notice the V-belt still in place.

2014-10-06 07.23.01

After taken out the water pump:

2014-10-11 21.35.11

Check out the thermostat top water hose. Size 10mm bolt. Also you will notice the water pump connector below the exhaust manifold.. took me a while to get it out. Actually mustn’t apply force as it gets tighter. Just need to repeatedly tap it to get it out. Ya, I replace the connector too.

2014-10-11 21.36.01

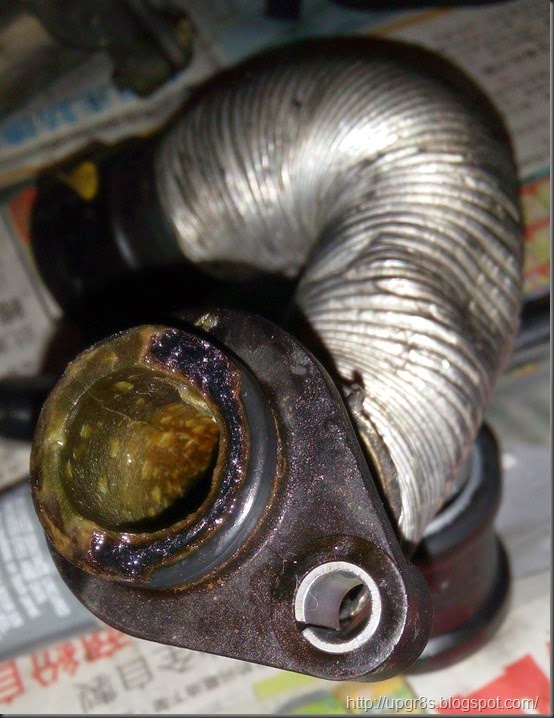
The old water hose, lucky I replaced it. Ya, I applied gasket maker here too :
2014-10-12 01.22.14

Another view at the stubborn connector:

2014-10-11 21.36.32

Bottom view:

2014-10-11 21.39.48

Back view:

2014-10-11 21.39.58

Check out all the screws and bolts taken out. How do you like my metal screw pan? I believe we bought it from IKEA toy section when my children were young. It was on the way out to the donation bin when I rescued it and turn it into a screw pan by adding few magnets at the bottom. Viola! No more losing screws.. Smile with tongue out

2014-10-11 22.11.29

Old versus new. I apply gasket maker whenever possible. In fact, I’m suspecting my leaks are from these areas and not the water pump.

2014-10-11 22.17.25

This is how I open the thermostat, using a 1/4” bit. 7 of these screws. 3 to secure the thermostat to it upper housing and 4 to secure the water pump.

2014-10-11 22.30.15

2 bottles of 1.5L coolant with 6L of distill water. Still plenty left.

2014-10-12 01.21.04

That’s all for now! Thank you for reading and please provide feedback or query if any.. Winking smile

Thursday, 22 March 2012

BMW N42, N46 Engine Cover Coolant Leak Fix (DIY)

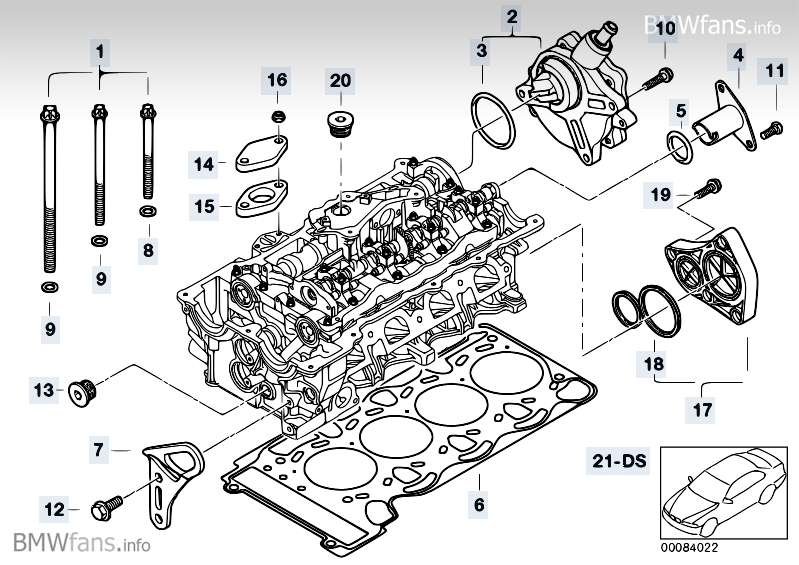
Part no: 11 53 7 505 411 / 11 53 7 583 666

PicsArt_1332290651168

It was worrying when my N46 keeps losing coolant. For the past 6 months, I’ve been patiently toping up the reservoir despite culprit idenrtified.

Symptom:

1. The coolant loss rate is very inconsistent and this warning came up on 2 separate occasions in the past 6 months despite bi-weekly check and top up when necessary:

image

2. Wet patch on the porch under the exhaust catalytic converter. Tried to wash the porch but the coolant stained spot remain wet long after other areas of the porch has dried up.

3. Burnt smell after driven the car. Leaked coolant drip onto the exhaust catalytic converter.

It took me a long while to discover the leak. I was under the car doing my routine oil change and I notice my cat box is coated with white powdery substance. So I went under the cat box and look up. I saw a black plate at the back of the engine covered with white residue. Viola! That’s the culprit:

Item 17 (Cover plate):

I managed to take this photo at one of the nearby BMW showroom:

2012-01-07 15.32.06

2012-01-07 15.32.28

I managed to tighten the 4 size 10mm bolts and hoping it’ll solve the problem and continue to monitor. After few months, situation didn’t improve. Of course, I have enquired at the part shop of the cost and bought a spare cap just in case.

The low coolant warning came up the second time last Tuesday and realising continue to top up is just a waste of my BMW coolant, I decided to took the plunge to replace the cap the next morning, before heading to office.. Smile with tongue out

This cap is inherited from the N42 block first introduced in the E46, meaning the E46 318i with the N42B20 2.0L 4 cylinder engine faces this same coolant leak problem if the cap fail.

I started off by clearing the microfilter housing above the firewall.

1. Lift up the harness cover that runs across the engine cover

2. Slide the harness cartridge out from the bottom microfilter housing by first slide out A1, A2, and A3 simultaneously. Follow by B1, B2, B3 to slide out the inner cartridge.

image

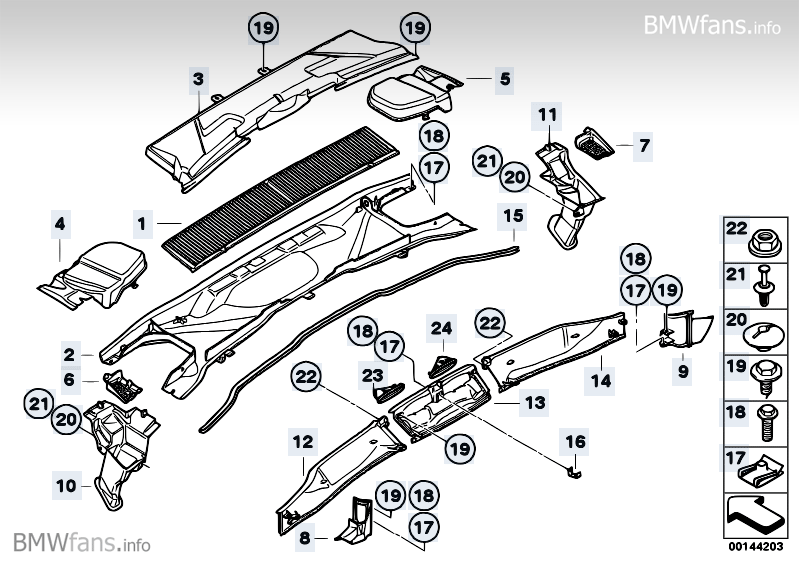
3. Remove the item 4 and 5 in the following diagram, left and right covering

4. Remove item 3in the following diagram: upper microfilter housing. (6 size 8mm screws)

IMG222

5. Remove item 2: bottom microfilter housing. 2 size 8mm screws at location 17), then slide the housing out horizontal away form the windscreen cover. There’s a wire connector on the housing, don’t forget to unplug the connector.

Below are the microfilter bottom and upper housings, notice a connector in the red circle. Wire need to unplug before pulling this off.

image

6. To access the rear engine cover which we wish to replace, we need to unplug the engine cover breather hose. This is where I stick my hand in to open the cover. Yes, I was lying on my tummy over the engine to perform this maneuver.. Smile

image

I manage to remove 3 of the 4 size 10mm bolts on the rear engine cover through “A” below while the 4th bolts has to be reach from the side (above exhaust manifold), label “B” below.

image

The entire DIY was performed with no line of sight to the component I wish to replace. Only feel by hands and fingers.

Caution: Make sure there’s no bolts, components or tools slip off your hand because it will be another DIY just to recover what fell off.. Surprised smile

This is the component I’m changing, brand new:

Outer:

LGIM0228

Inner (Notice the 2 circular grey color with black edge rubber seals, joined at one end.:

M1

This the worn cover taken out, check out the flatten rubber seals, totally harden, flatten and worn.. Surprised smile

IMG214

Now repeat the process to put everything back.. Smile

Notes:

~ Make sure you clean the mounting surface on the cylinder header before installing the new cover. I use my finger nail to scrape the harden stuck rubber on the header.

~ Took me a while to remove the cover despite all 4 screws removed. The harden rubber seal stuck on to the cylinder header. I used an industrial pen knife to pry it off.

image

~ After fitting all back, I filled slightly over 2L of coolant into the cooling system.

IMG224

~ Don’t forget to check coolant level again after a day.

~ I actually forgotten to install the breather hose. Ended up dismantling everything again.. Sad smile

Thank you for reading and do provide feedback if any.

Winking smile