Friday, 20 October 2017

BMW E90 Rear Absorber Replacement (DIY)

DIY Disclaimer: I hold no responsibility should anything goes wrong when you decided to follow my guide. It’s strictly meant as a reference for knowledge sharing purposes.

Parts that I bought:

Shock absorber rear (Bilstein): 33 52 6 771 725: $220 x 2

Shock absorber rubber mounting rear FEBI: 33 52 6 768 544: $75 x 2

Guide support, upper FEBI: 33 52 6 771 737: $30 x 2

Guide support, lower FEBI:  33 52 6 771 738: $30 x 2

Damper:  33 52 6 767 334:: $45 x 2

The car is turning 10 years old next month and has clocked almost 130k km since rolling out of factory.

Front absorbers were replaced in Jun 2016 because leaks. Now its the rear absorbers’ turn. Check out the leaks in the following photos:

image

I also noticed some fine hairline cracks on the bottom absorber mount, hence decided to replace them too.

image

The tricky part about this DIY is the bottom mount fasterning bolt. There are the E-Torx type which I do not have the tool to open them. Check out the following photo, refer to the yellow arrows.

image

I went online and ordered the following:

image

But before the item arrives, I ran out of patience and do it my way by using the following, size 10mm 1/2’ socket..

image

The following is the replacement set, ready for the be installed.

image

Step 1 is actually go under the car and try loosen the E-Torx and the bottom absorber nut. Once that is done, we more on to the upper nut as show in the following photo. A size 17” ring spanner with a 6mm hex bit on a 3/8” ratchet.

image

Viola!

image

Reverse the process and tadaa!!

image

I did use a jack to give me more room in the wheel well because I did not remove the wheels. The car is supported by the springs which we did not remove, that is why we can remove the absorber without removing the wheels.

Time spent: a good 2 hours of workout.

image

More photos after the jump..

image

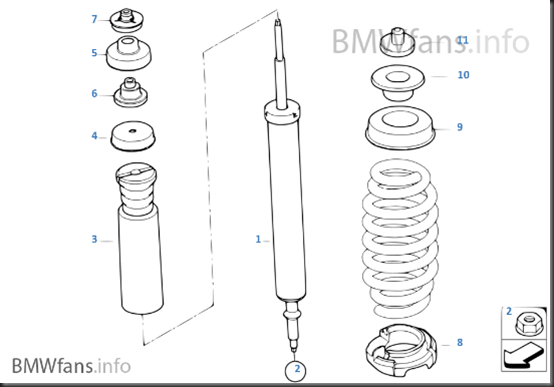
The black and silver part below which are represented by item 5 and 4 above were not repalced. Item 3, the damper comes in a completed set with the black plastic sleeve.
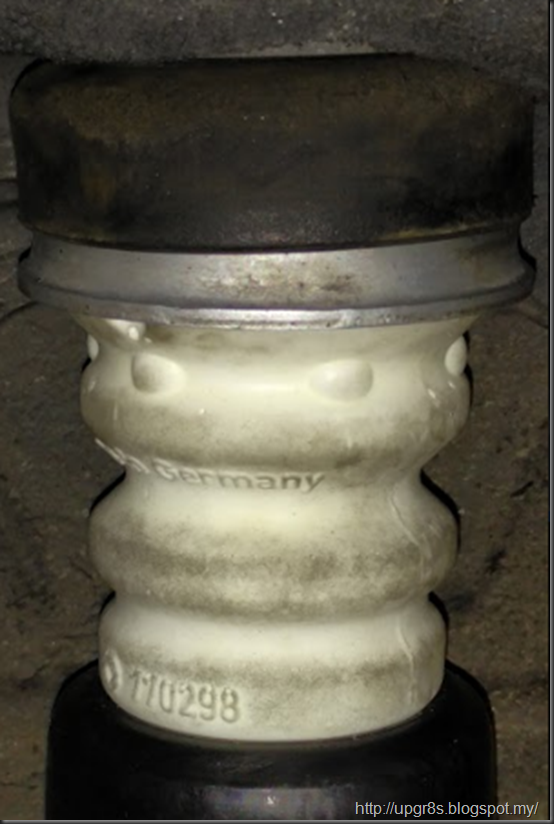
image

The following is the used top guide support (Upper), item 7 in the diagram. If you ask me, I would suggest re-use them because the material is still not compromised despite the worn marks.

image

The photo below you can see (diagram item 6) the top guide support (lower) is compromised, syggest replacement.

image

See, bad shape..

image

What about bottom mount? I think can still use because the part is very sturdy destipe the hairline cracks but since I bought, I replaced them too.

Thursday, 3 November 2016

Avanza: Power window master switch failure (solved)

DIY Disclaimer: I hold no responsibility should anything goes wrong when you decided to follow my guide. It’s strictly meant as a reference for knowledge sharing purposes.

Part number: 84820-B0010

A new switch would set you back USD39.98

image

Carefully pry open the bottom of the power window controller.

IMG_20161029_181108132

Carefully lift up the printed circuit board

image

You will notice the failed switch has a broken white color plastic which is responsible to maintain the position of the rocker/flipper switch.

image

Viola! Discovered “Satay” stick is the perfect replacement for the broken plastic.

image

image

Cut the “Satay” stick to the required size

image

When reinstalling the printed circuit board, make sure the white color switch slide is in the middle and fitted into the roker switch.

image

Test the switch. If too tight, the Satay is too long, vice versa.. Laughing out loud

Saturday, 30 July 2016

BMW E90 320i N46B20 Cooling System Leakage


DIY Disclaimer: I hold no responsibility should anything goes wrong when you decided to follow my guide. It’s strictly meant as a reference for knowledge sharing purposes. 

Symptom:

1. Coolant warning pops up.

image

2. Wetness on the bottom engine cover directly below the intake manifold area.

image

3. On closer inspection, stick a torchlight behind the oil filter housing

IMG_20160729_225451975

You will see this..

IMG_20160729_225508034

IMG_20160729_225430529_HDR

The following is the culprit..

image

Source: http://bmwfans.info/parts-catalog/E90/Malaysia/320i-N46/R-N/apr2007/browse/engine/cooling_system_water_hoses/#7560130_4

Parts required:

Item 4: Connector: 11 53 7 560 130, comes with profile gasket

IMG_20160730_144004437

I also bought the hose (Item 1 below) because coolant stains appear at the connector area.

Hose f engine inlet and addit.water pump: 64 21 6 928 590

http://bmwfans.info/parts-catalog/E90/Malaysia/320i-N46/R-N/apr2007/browse/heater_and_air_conditioning/additional_water_pump_water_hose_valve

Additional water pump/Water hose/Valve

Only 2 size 10mm bolts holding to the Connector, very easy job.

After the connector is removed:

IMG_20160730_152102766

New versus old

IMG_20160730_153852082_HDR

The culprit.. just the gasket..but for peace of mind replace the entire connector.

IMG_20160730_153858059_HDR

Lastly, top up coolant accordingly.

OK folks! That’s all the photos I have to share.

Good luck and thanks for dropping by.. Winking smile

Saturday, 28 November 2015

BMW E90 320i N46B20 Valve Cover Membrane / Diaphragm

DIY Disclaimer: I hold no responsibility should anything goes wrong when you decided to follow my guide. It’s strictly meant as a reference for knowledge sharing purposes.

Symptom:

We can smell oil fume from inside the cabin through the a/c vents but it stops when we switch to internal air circulation mode.

From the engine, you will notice the valve cover is wet with oil stain as follows

image

image

image

A check on the parts catalogue revealed that this N46 engine belongs the the LCI model with 156hp, some called it N46N as my E90 320i was the last batch of the pre-LCI model. There is no more CCV in my model

Below is the part catalogue for my vehicle where this membrane is missing:

Part Code: 11127555212

http://bmwfans.info/parts-catalog/E90/Malaysia/320i-N46N/R-N/browse/engine/cylinder_head_cover#7555212_1

image

Online search pointed me to this website where they actually make the repair kit: http://vanos-bmw.com/membrane-for-cover-n46n-bmw-11127555212

image

I then contacted the local parts dealers and found out they do not sell the repair kit, but the entire valve cover.

Running out of option, I attempted to pry it off and see where it takes me..

After one hour of careful prying.. VIOLA!!

image

image

You will notice centre of the membrane has detached from the rest of the section, hence allowing oil fume to escape.

image

Carefully, I cleaned them up, took out my cobbler glue and used bicycle tube (refer to the black color item below, shaped like a flower Open-mouthed smile).

image

Then I put them together.. to reinforce the broken centre piece.

image

Mission accomplished!

I assemble the kit and cap it back in. One mistake, I forgot to reattach the spring.. Smile with tongue out

Another round of prying to refit the spring.

Thank you for reading and please provide feedback or query if any.. Winking smile

Updated: 11/4/2016..

It has been working fine now. 6 months down the road..

Ta-dah! No more oil stains, only dust stain. The leak was actually very serious, I lose lots of engine oil.. so mush so, it drips on my porch. Now my porch is dry like a dessert.. ! I’m pretty sure if I were to visit a mechanic then, they will most likely advise to replace flywheel oil seal and oil pan gasket. Pheew!

To all N46N owner out there, please take note!

image