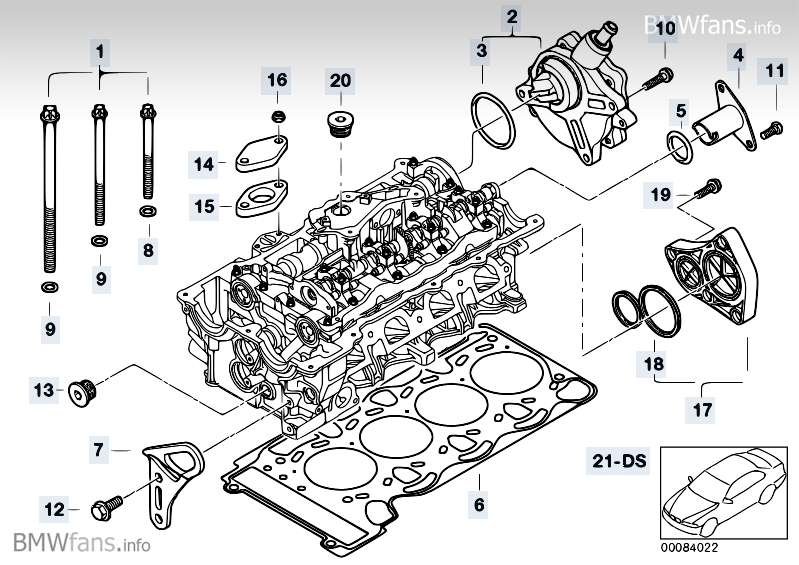
Part no: 11 53 7 505 411 / 11 53 7 583 666
It was worrying when my N46 keeps losing coolant. For the past 6 months, I’ve been patiently toping up the reservoir despite culprit idenrtified.
Symptom:
1. The coolant loss rate is very inconsistent and this warning came up on 2 separate occasions in the past 6 months despite bi-weekly check and top up when necessary:
2. Wet patch on the porch under the exhaust catalytic converter. Tried to wash the porch but the coolant stained spot remain wet long after other areas of the porch has dried up.
3. Burnt smell after driven the car. Leaked coolant drip onto the exhaust catalytic converter.
It took me a long while to discover the leak. I was under the car doing my routine oil change and I notice my cat box is coated with white powdery substance. So I went under the cat box and look up. I saw a black plate at the back of the engine covered with white residue. Viola! That’s the culprit:
Item 17 (Cover plate):
I managed to take this photo at one of the nearby BMW showroom:
I managed to tighten the 4 size 10mm bolts and hoping it’ll solve the problem and continue to monitor. After few months, situation didn’t improve. Of course, I have enquired at the part shop of the cost and bought a spare cap just in case.
The low coolant warning came up the second time last Tuesday and realising continue to top up is just a waste of my BMW coolant, I decided to took the plunge to replace the cap the next morning, before heading to office.. ![]()
This cap is inherited from the N42 block first introduced in the E46, meaning the E46 318i with the N42B20 2.0L 4 cylinder engine faces this same coolant leak problem if the cap fail.
I started off by clearing the microfilter housing above the firewall.
1. Lift up the harness cover that runs across the engine cover
2. Slide the harness cartridge out from the bottom microfilter housing by first slide out A1, A2, and A3 simultaneously. Follow by B1, B2, B3 to slide out the inner cartridge.
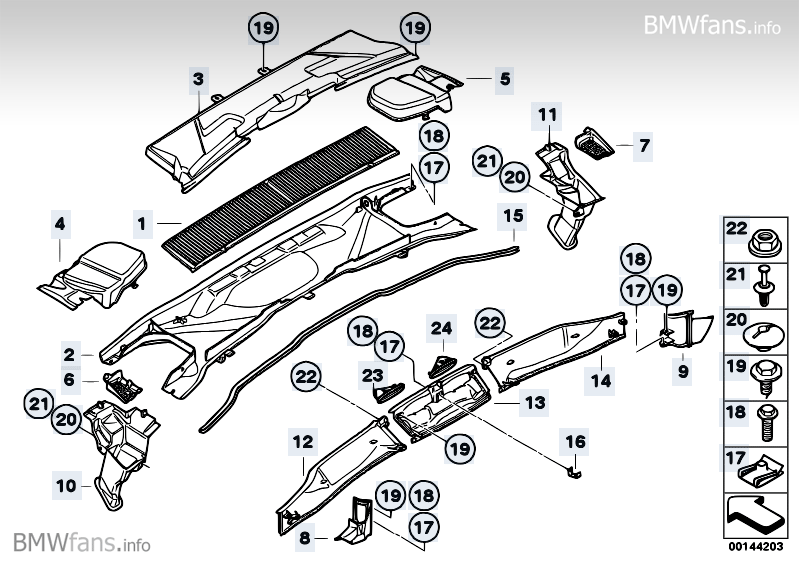
3. Remove the item 4 and 5 in the following diagram, left and right covering
4. Remove item 3in the following diagram: upper microfilter housing. (6 size 8mm screws)
5. Remove item 2: bottom microfilter housing. 2 size 8mm screws at location 17), then slide the housing out horizontal away form the windscreen cover. There’s a wire connector on the housing, don’t forget to unplug the connector.

Below are the microfilter bottom and upper housings, notice a connector in the red circle. Wire need to unplug before pulling this off.
6. To access the rear engine cover which we wish to replace, we need to unplug the engine cover breather hose. This is where I stick my hand in to open the cover. Yes, I was lying on my tummy over the engine to perform this maneuver.. ![]()
I manage to remove 3 of the 4 size 10mm bolts on the rear engine cover through “A” below while the 4th bolts has to be reach from the side (above exhaust manifold), label “B” below.
The entire DIY was performed with no line of sight to the component I wish to replace. Only feel by hands and fingers.
Caution: Make sure there’s no bolts, components or tools slip off your hand because it will be another DIY just to recover what fell off.. ![]()
This is the component I’m changing, brand new:
Outer:
Inner (Notice the 2 circular grey color with black edge rubber seals, joined at one end.:
This the worn cover taken out, check out the flatten rubber seals, totally harden, flatten and worn.. ![]()
Now repeat the process to put everything back.. ![]()
Notes:
~ Make sure you clean the mounting surface on the cylinder header before installing the new cover. I use my finger nail to scrape the harden stuck rubber on the header.
~ Took me a while to remove the cover despite all 4 screws removed. The harden rubber seal stuck on to the cylinder header. I used an industrial pen knife to pry it off.
~ After fitting all back, I filled slightly over 2L of coolant into the cooling system.
~ Don’t forget to check coolant level again after a day.
~ I actually forgotten to install the breather hose. Ended up dismantling everything again.. ![]()
Thank you for reading and do provide feedback if any.
![]()


