DIY Disclaimer: I hold no responsibility should anything goes wrong when you decided to follow my guide. It’s strictly meant as a reference for knowledge sharing purposes.
2007 BMW E90 N46B20
Mileage: 85k km
Been noticing the roundel is losing engine oil and noticeable around the base of oil filter housing. There are 2 gaskets as shown in diagram below, item 5 and 6.
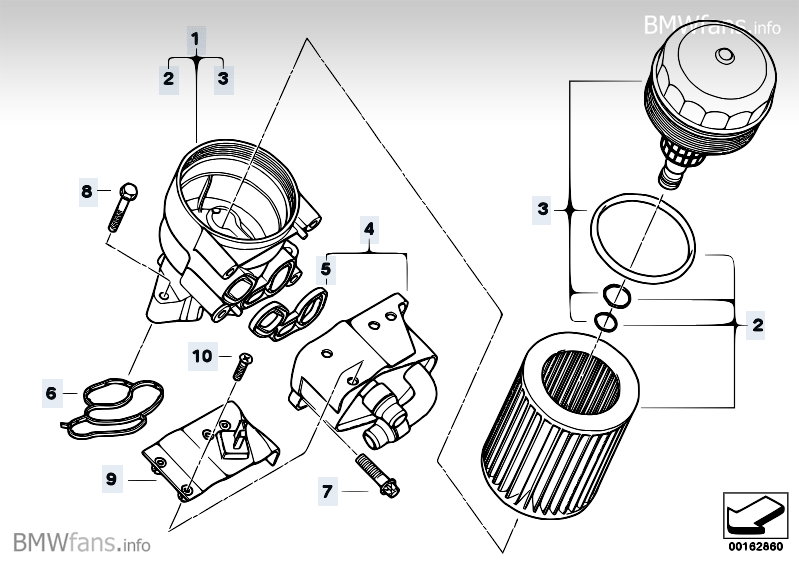
It is very interesting to discover that my car don’t have item 9 and 10.
These are the gaskets I bought.. RM15(Gasket: 11 42 7 508 970) and RM23 (Profile-gasket: 11 42 7 508 971), respectively.

Okay, here goes the DIY procedure..
1. Open item 13 (intake manifold), unplug connector (item 17), followed by removing item 1 (intake silencer).
Note: Item 9 will be stuck to item 13 while item 11 and 8 will be stuck to item 1. 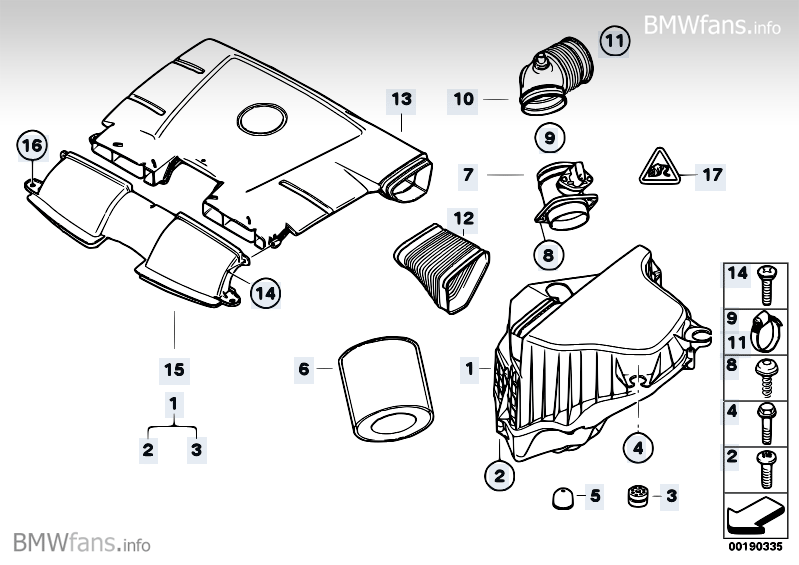
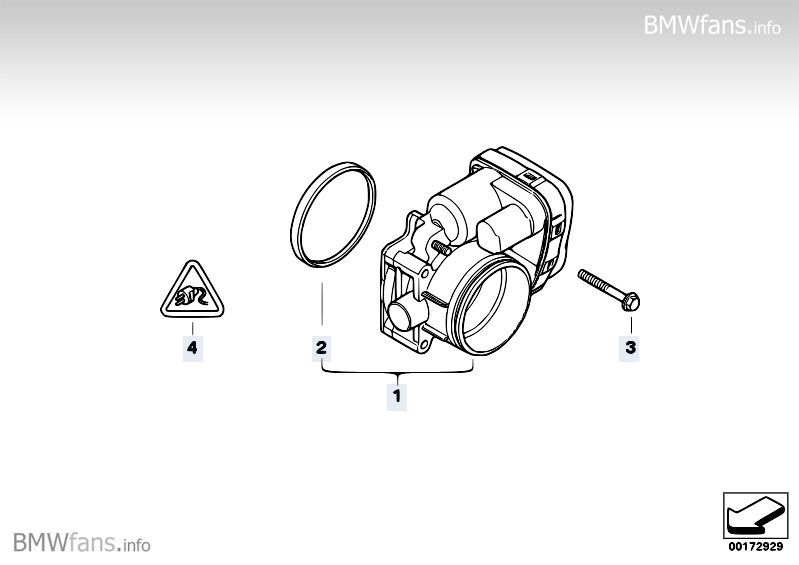
2. Unplug connector item 4 below. Open the throttle housing assembly: 13 54 1 439 580, item 3 below is a size 10 bolt and there are 4 to open, all similar size and length.

3. Lay old news paper to cover the alternator and whatever expose area that’s vulnerable to oil drip when we dismantle the oil filter housing and coolant heat exchanger.
4. Remove all 4 Torx bolts (item 7) securing the heat exchanger. All same size.

5. Now we unscrew the 3 size 10 bolts securing the base of the oil filter housing.

6. Replace the 2 rubber gaskets. Photo below shows I’m digging the oil filter housing bottom gasket.. notice how flat is the gasket? The heat exchanger gasket has be replaced in the photo, notice the difference in rubber surface texture? ![]()


The old gasket is harden and brittle.. proceed with caution if you want to remove it in one complete piece.

New gasket..
7. Clean the 2 connecting surfaces and install everything back in reverse order.

That’s all folks! ![]()
My supervisor paying close attention while the job is performed.. ![]()

Thank you for reading and please provide feedback or query if any.
Next job should be valve cover gasket.. really.. ![]()
Hi, i am a big fan of home garage and your blog seems very useful for beginners like me. Perhaps i can contact you in future for reference :-). By the way, may i know which place do u always get the parts? I'm in kota damansara and own e90 yr 2006. Thanks for ur help
ReplyDeleteI usually get my parts from Suan Huat Sea Part.. http://www.suanhuat.com.my/
DeleteHi does the alternator not have to be removed on the e90 as in most of the videos which are usually 6 cylinder engines the are taken out.
ReplyDeleteThanks Eamonn
I did not remove alternator. Even V-belt is not removed.
DeleteHi. Thanks for putting up this. I haven't been able to find anything elsewhere showing how to do this job on this engine.
ReplyDeleteI presume there is a specific torx bit required to remove the bolts? Can you confirm what size that is? I'm new to BMWs to have no idea about them yet.
I have a 2005 E46 with the same N46B20 engine so am very pleased you've been able to show me just what I need to do to get this job done.
Thanks
I've seen a link to this page suggesting they are T25 Torx - would that be correct?
DeleteT30
DeleteT30
DeleteThanks Astroboy.
DeletePlanning on tackling this job this afternoon. Wish me luck.
Adrian
Couldn't budge the torx bolts and didn't want them to get stripped. Might require a trip to the mechanics after all.
DeleteThe T30? Hmm.. stubborn..
Deletehad another go at it this morning and amanged to get the T30s off using a breaker bar for extra leverage. had to remove the water hoses to get at one bolt though.
DeleteWhat did you use to clean up the oil and residual gasket material?
Also, did you find any torque specs for the screws (both 10mm and T30)? My Haynes Repair Manual doesn't even mention this repair which I find quite strange considering how straight forward it appears (once you've tried it).
DeleteGreat breakthru!
DeleteI use plenty of toilet paper to wipe clean both contact surface. After installation, I use some pink color chemical spray meant for air conditioner cleaning to get rid of the oil residual surrounding the area.
Nope, I do not have any torque wrench and these tiny bolts I just torque with by finger muscles.. it need not be too tight. Enough force to compress the rubber oil seal will do.
Opps. Snapped one of the M6 bolts tightening it! Went down to the BMW dealership yesterday to pick up some replacements (in their warehouse so gotta go back to pick them up this morning).
DeleteWhile I was there though I chatted with their service department who suggested these bolts only require 8-10Nm torque. That's less than the min setting on my 1/2" torque wrench so I might use some of the $300 labout costs I'm saving (they originally quoted me for this job) to get myself a 1/4" wrench. Still saving money and in my mind I get a new tool for free.
Luckilly the snapped bolt was protruding slightly so I was able to extract it with a set of pliers. Should be able to get this all tidied up this afternoon.
Ouch.. those are small size 10mm equivalent.. you need to perform more DIY to get the hang of it.. 😂
DeleteSigh. Finally got this sorted only to find I've still got an oil leak somewhere. Was so sure this was the problem. (Unless I still need to tighten these bolts further).
DeleteOil is basically getting onto the serpentine belt and then being sprayed around the engine bay in line with it. Will try to clean everything up and have another look for a leak.
Have you had this issue before?
What about Vanos solenoids gaskets? Let's hope it's not the crank pulley oil seal..
DeleteUpdate. Booked into BMW specialist on Friday. Look's like it might be the front Shaft Seal. I cleaned up the engine again and used Baby Powder to help locate a leak. Couldn't see any oil coming from anywhere but oil was still getting on the Belt. A Closer look suggested oil was dripping down from behind the Vibration Damper. Can't see behind it but I think it's coming from the seal, dripping down onto the damper and then onto the belt. From there it distributes itself around the engine bay.
DeleteHad a look at some shaft seal repair DIYs online but think it's a bit beyond my tools right now, primarily the torque required to remove and replace the Hex Bolt holding the Damper on.
From what I can see though, this would only be about an hour's work for a specialist and the seal costs about USD$35 (NZD$70) to replace so I'm happy to let the experts take care of this one.
All sorted. BMW guys confirmed the front Shaft Seal needed replacing as I suspected. Thanks for your help here.
Delete😱.. must have cost a 💣
Delete😱.. must have cost a 💣
DeleteCost me $238 all up including about $60 for the replacement part. The front seal was fairly straight forward to access so labour costs were fairly low. Just removed the belt, pulled off the Crank Pulley to access the seal. Getting the pulley off is apparently not the easiest thing to do. high torque setting and a weird bolt pattern on it makes things a little difficult. They had one of their bespoke shop tools made specifically for the task.
ReplyDeleteThey even cleaned up all the old oil around and under the engine which was nice of them. Job done.
I changed my crank pulley seal by simply removing the three small bolts and not the large centre bolt (N46 engine in '04 E46 318i M Sport). Doug
ReplyDeleteNeither did it require a puller!
Deletehi, did you have to detach the water lines on the heat exchanger?
ReplyDeleteNope. If u refer to last photo, the heat exchanger lines are intact.
Delete