Part no: 11 53 7 505 411 / 11 53 7 583 666

It was worrying when my N46 keeps losing coolant. For the past 6 months, I’ve been patiently toping up the reservoir despite culprit idenrtified.
Symptom:
1. The coolant loss rate is very inconsistent and this warning came up on 2 separate occasions in the past 6 months despite bi-weekly check and top up when necessary:

2. Wet patch on the porch under the exhaust catalytic converter. Tried to wash the porch but the coolant stained spot remain wet long after other areas of the porch has dried up.
3. Burnt smell after driven the car. Leaked coolant drip onto the exhaust catalytic converter.
It took me a long while to discover the leak. I was under the car doing my routine oil change and I notice my cat box is coated with white powdery substance. So I went under the cat box and look up. I saw a black plate at the back of the engine covered with white residue. Viola! That’s the culprit:
Item 17 (Cover plate):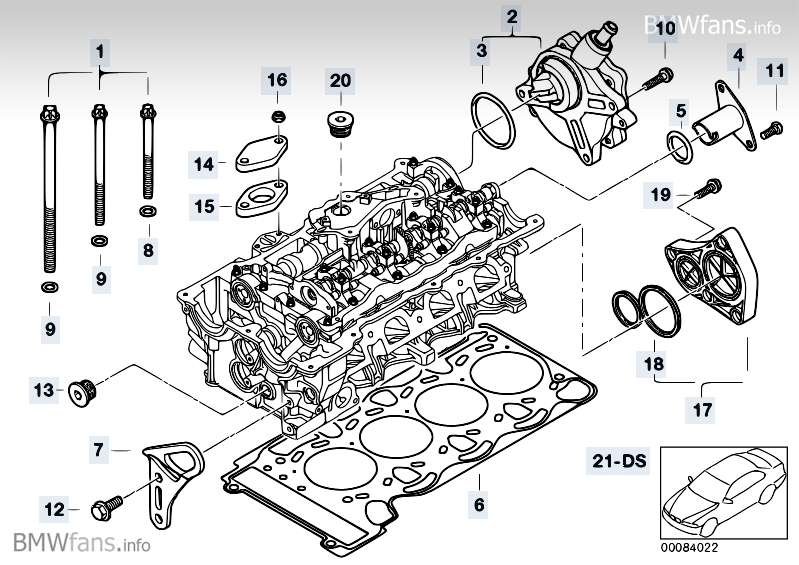
I managed to take this photo at one of the nearby BMW showroom:


I managed to tighten the 4 size 10mm bolts and hoping it’ll solve the problem and continue to monitor. After few months, situation didn’t improve. Of course, I have enquired at the part shop of the cost and bought a spare cap just in case.
The low coolant warning came up the second time last Tuesday and realising continue to top up is just a waste of my BMW coolant, I decided to took the plunge to replace the cap the next morning, before heading to office.. ![]()
This cap is inherited from the N42 block first introduced in the E46, meaning the E46 318i with the N42B20 2.0L 4 cylinder engine faces this same coolant leak problem if the cap fail.
I started off by clearing the microfilter housing above the firewall.
1. Lift up the harness cover that runs across the engine cover
2. Slide the harness cartridge out from the bottom microfilter housing by first slide out A1, A2, and A3 simultaneously. Follow by B1, B2, B3 to slide out the inner cartridge.

3. Remove the item 4 and 5 in the following diagram, left and right covering
4. Remove item 3in the following diagram: upper microfilter housing. (6 size 8mm screws)

5. Remove item 2: bottom microfilter housing. 2 size 8mm screws at location 17), then slide the housing out horizontal away form the windscreen cover. There’s a wire connector on the housing, don’t forget to unplug the connector.
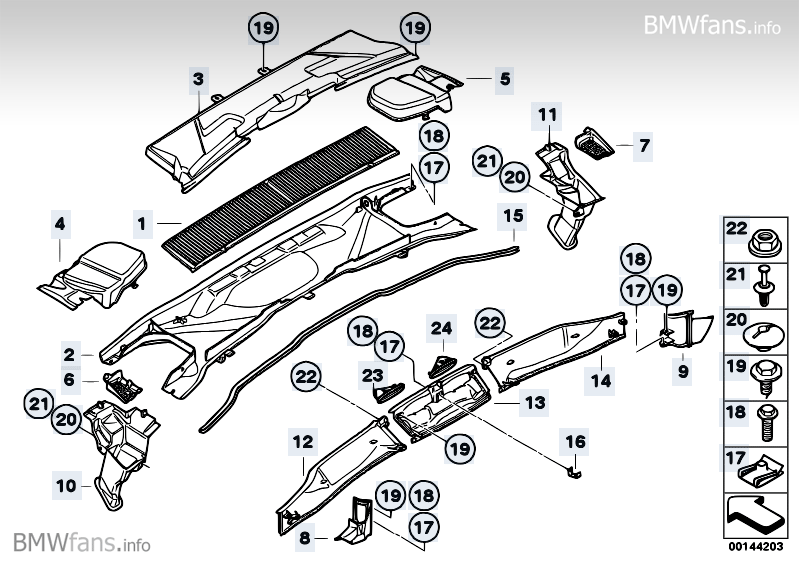
Below are the microfilter bottom and upper housings, notice a connector in the red circle. Wire need to unplug before pulling this off.

6. To access the rear engine cover which we wish to replace, we need to unplug the engine cover breather hose. This is where I stick my hand in to open the cover. Yes, I was lying on my tummy over the engine to perform this maneuver.. ![]()

I manage to remove 3 of the 4 size 10mm bolts on the rear engine cover through “A” below while the 4th bolts has to be reach from the side (above exhaust manifold), label “B” below.

The entire DIY was performed with no line of sight to the component I wish to replace. Only feel by hands and fingers.
Caution: Make sure there’s no bolts, components or tools slip off your hand because it will be another DIY just to recover what fell off.. ![]()
This is the component I’m changing, brand new:
Outer:

Inner (Notice the 2 circular grey color with black edge rubber seals, joined at one end.:

This the worn cover taken out, check out the flatten rubber seals, totally harden, flatten and worn.. ![]()

Now repeat the process to put everything back.. ![]()
Notes:
~ Make sure you clean the mounting surface on the cylinder header before installing the new cover. I use my finger nail to scrape the harden stuck rubber on the header.
~ Took me a while to remove the cover despite all 4 screws removed. The harden rubber seal stuck on to the cylinder header. I used an industrial pen knife to pry it off.

~ After fitting all back, I filled slightly over 2L of coolant into the cooling system.

~ Don’t forget to check coolant level again after a day.
~ I actually forgotten to install the breather hose. Ended up dismantling everything again.. ![]()
Thank you for reading and do provide feedback if any.

“It took me a long while to discover the leak. So I went under the cat box and look up. I saw a black plate at the back of the engine covered with white residue. Viola! That’s the culprit.” It really pays to conduct a meticulous overall check-up of your car. This is so you can be certain you did not overlook any budding problems that might become worse in the long run. Anyway, good job on doing the repairs!
ReplyDeleteMatha Trotter
thanks mate for your post i was about to scrap car then came across this post so im tackling job unfortunately i also have a leak on thermostat housing so a long job ahead to see if it works
DeleteThis will definitely help BMW owners who have the same problem as yours. Who would have thought that it was a loose cover that caused the leaks? The hose and the gaskets are the usual culprits when it comes to a leaking cooling system because they are more visible. Anyway, it would be good to check your car regularly to avoid problems like this again.
ReplyDelete@Phil Craig
A responsible car owner will always have his or her car checked for regular maintenance. In doing so, expensive, future car repairs can be prevented. Also, this will ensure that your car is in perfect condition which means more fun and more exciting trips!
ReplyDelete-Michelina Douglass
Top man - Great guide !
ReplyDeletethis sounds like the same type of work to get to the part, as you did for the vaccum pump and the rocker cover gasket.. btw, i did these jobs one day, and what a pain it was. i might have to go there, as I have a mysterious hex bolt left over as i suspect it is from the cover plate or the attachment sleeve.
ReplyDeleteThanks for your guide...maybe a little more specs on the torque setting for wrench, etc..
Thanks for your feedback Nadir, I don't have a torque wrench :p and these are size 10mm bolts of similar size, that's close to each other where I tighten with the same short 10mm wrench. So it's not too difficult to tighten with consistent torque and I rely on past experience on required torque to avoid breaking the bolt or cracking the header. In this case, my finger is the torque gauge.. B) Been almost 2 years now, so far so good, no leakages.
ReplyDeleteIve done all of this but now its still leaking any ideas ??
ReplyDelete1. Hoses, radiators, heat exchangers?
Delete2. Thermostat housing, water pump, thermostat?
Hi, did you drain the coolant before you took this cover off?
DeleteI didn't.. :p
DeleteThis comment has been removed by the author.
ReplyDeleteCan't thank you enough for this article. I would never have found the leak if wasn't for your effort.
ReplyDeleteThe new part was surprisingly cheap from BMW (just over 8 pounds) and didn't take long to replace. Access is helped by removing the left hand strut brace, enabling all four bolts to be reached with a ring spanner from the same side.
I also used copper grease on the bolt threads so they come out easier if I have to do the job again (something I make a point of doing with most fasteners as it pays dividends in the future).
Once again, thanks for the article - top bloke!
You are most welcome Dave and certainly glad knowing others find my old postings useful.. 😇
DeleteYou are most welcome Dave and certainly glad knowing others find my old postings useful.. 😇
Deleteastoboy your guide help us a lot, thank you! could help more, we change that part for new, everything seems to be fine so far. Cheers man
ReplyDeleteYou are most welcome.
DeleteBtw we made this lid to preasure up the cooling system so the engine may be turn off, and coolant leak even more. so you cant miss where it leaks.
ReplyDeletehttps://postimg.org/image/cp3mawzqv/
https://postimg.org/image/som9ugvsn/
Thank you very much, I had this problem last night. I'll go and buy this part tomorrow. is it Engine Cover Coolant ?
ReplyDeleteIt's called "COVER PLATE" with part number: 11 53 7 505 411 / 11 53 7 583 666
Deletecheck out the beneath listed top 10 models of vehicle covers to be able to assuredly preserve your treasured vehicle free from external damage. liberty car covers
ReplyDeletehi guys i need help asap pls, i change the same part on my car and added 3L on coolant and now i need to bleed the system i looked everywhere but i cant find how to do it my car not self bleeding system.
ReplyDeletethank you
http://s135.photobucket.com/user/mystreba/media/bmw%20pics/N54%20OFH%20gasket%20DIY/IMG_2499_zps13865b48.jpg.html
Deletethnx mate i did try this but its not working no idea what to do
DeleteOur reservoir is designed with self bleeding mechanism.. open the reservoir cap and start the engine to let it run, u will see coolant going into the tank via the top tiny hose with the bleeding bolt. Keep it flowing and you will see air gushing out and until a steady stream coming in, bleeding is completed. Thermostat only open at 105°c.. get ready to close the cap when u see the coolant level raising fast, which means thermostat has opened.
Deletesweet thnx mate i will give it a go
DeleteThis comment has been removed by the author.
ReplyDeleteGreat post i got a couple of questions
ReplyDeleteWas this done from the top of the engine and did you drop the coolant
Thanks
1. Done from the top. Can't reach from bottom because obstructed by the transmission case.
Delete2. Nope, I didn't drop the coolant, it will leak but I just top up.
Hello could you chcek your email ?? I have send you message regarding cooling issues Martin
ReplyDelete😂👌
DeleteThis comment has been removed by a blog administrator.
ReplyDeleteWow thank you so much for this post. Last week whilst at the traffic lights i also discovered some smoke coming from under my car, parked by the road side and saw some leak from the centre of the car near the back of the engine. I gave my mech this article and in an hour problem was fixed....
ReplyDeleteAm glad to hear that your ride is ok now.
DeleteHi guys I have the same leak in my e90 could you post the part number
ReplyDeleteIt's posted. Just after the subject title on the top page.
DeletePart no: 11 53 7 505 411 / 11 53 7 583 666
Hey astroboy, You sound like you know what your doing. What a relief!! I have this problem so ordered the part and collecting tomorrow. In the mean time i have stripped out pollen filter casing etc but am struggling to get my hands between cover and bulkhead to remove old unit. Am i doing something wrong? My car is 318ci N46 B20A and i don't have strut braces. Any advice gratefully recieved
ReplyDeleteThank you so much. You just saved me. What a wonderful quite helpful post.
ReplyDeleteJust did this job along with the vacuum pump gaskets. Very useful tutorial, especially that picture of the cover because you are working blind the whole time you need it to position the new cover. For anyone trying this DIY, you should also change the vacuum pump seals while you are there. Its easier to get to those bolts when the pump is out. Also you definitely need to have a small 1/8 ratchet with a 10mm, alot of time, patience , and probably a 6 pack of your favourite beer...
ReplyDeleteThanks for this information , I had the same problem on BMW E90. Great job.
ReplyDeleteThanks for the information Sir.
ReplyDeleteGreatful to you for taking the time to share this with us all.
Selvan Pillay
South Africa
Thanks for dropping by. Glad my sharing helps.. 👍
DeleteHi, do you have the torque specs for those bolts? Thanks
ReplyDeleteApply the same torque as your valve cover bolts, same size, same matetrial, 10Nm.
DeleteGreat post! Thank you for your effort! Appreciate it very much!
ReplyDeleteGreat read! Staying consistent with basics like a synthetic oil change really helps extend engine life and reduce long term costs. At Kwik Kar Auto Dallas, we see every day how a timely synthetic oil change supports Car Repair and maintenance, especially for drivers relying on dependable Auto Care. Pairing smart fluid checks with professional Auto Repair Services keeps any Vehicle Repair Shop visit simple and predictable. Solid advice for anyone focused on Car Maintenance, Automotive Repair Services, and choosing the right Auto Repair Shop or Car Repair Workshop for reliable Vehicle Repair.
ReplyDelete